Android 中 Activity
Android 中 Activity 是作为应用程序的载体存在,代表着一个完整的用户界面,提供了一个窗口来绘制各种视图,当 Activity 启动时,我们会通过 setContentView 方法来设置一个内容视图,这个内容视图就是用户看到的界面。那么 View 和 activity 是如何关联在一起的呢 ?
Android的UI层级绘制体系
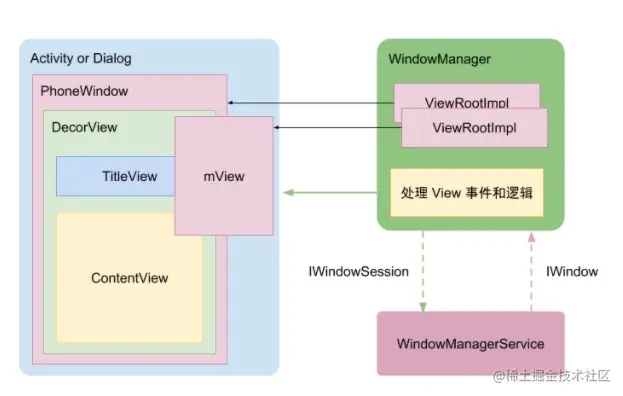
上图是View与Activity之间的关系,先介绍一下上面这张图
- PhoneWindow:每个Activity都会创建一个Window用来承载View的显示,Window是一个抽象类,PhoneWindow是Window的唯一实现类,该类中包含一个DecorView。
- DecorView:最顶层的View,该View继承自 FrameLayout,它的内部包含两部分,一部分是ActionBar ,另一部分ContentView,
- ContentView:我们 setContentView() 中传入的布局,就在该View中加载显示
- ViewRootImpl:视图层次结构的顶部。一个 Window 对应着一个 ViewRootImpl 和 一个DecorView,通过该实例对DecorView进行控制,最终通过执行ViewRootImpl的performTraversals()开启整个View树的绘制,
View的加载流程
- 当调用 Activity 的setContentView 方法后会调用PhoneWindow 类的setContentView方法
public void setContentView(@LayoutRes int layoutResID) {
    getWindow().setContentView(layoutResID);
    initWindowDecorActionBar();
}
- PhoneWindow类的setContentView方法中最终会生成一个DecorView对象
@Override
public void setContentView(int layoutResID) {
    if (mContentParent == null) {
         //在这里生成一个DecorView
        installDecor();
    } else if (!hasFeature(FEATURE_CONTENT_TRANSITIONS)) {
        mContentParent.removeAllViews();
    }
    ...
}
private void installDecor() {
    mForceDecorInstall = false;
    //mDecor  为DecorView
    if (mDecor == null) {
        mDecor = generateDecor(-1);
        mDecor.setDescendantFocusability(ViewGroup.FOCUS_AFTER_DESCENDANTS);
        mDecor.setIsRootNamespace(true);
        if (!mInvalidatePanelMenuPosted && mInvalidatePanelMenuFeatures != 0) {
            mDecor.postOnAnimation(mInvalidatePanelMenuRunnable);
        }
    } else {
        mDecor.setWindow(this);
    }
    ...
 }
protected DecorView generateDecor(int featureId) {
   ...
   // 在这里直接 new 了一个DecorView
   return new DecorView(context, featureId, this, getAttributes());
}
- DecorView容器中包含根布局,根布局中包含一个id为content的FrameLayout布局,Activity加载布局的xml最后通过LayoutInflater将xml文件中的内容解析成View层级体系,最后填加到id为content的FrameLayout布局中。
protected ViewGroup generateLayout(DecorView decor) {
    //做一些窗体样式的判断
       ...
     //给窗体进行装饰
    int layoutResource;
    int features = getLocalFeatures();
    // System.out.println("Features: 0x" + Integer.toHexString(features));
    //加载系统布局 判断到底是加载那个布局
    if ((features & (1 << FEATURE_SWIPE_TO_DISMISS)) != 0) {
        layoutResource = R.layout.screen_swipe_dismiss;
        setCloseOnSwipeEnabled(true);
    }
...
    mDecor.startChanging();
    //将加载到的基础布局添加到mDecor中
    mDecor.onResourcesLoaded(mLayoutInflater, layoutResource);
    //通过系统的content的资源ID去进行实例化这个控件
    ViewGroup contentParent = (ViewGroup)findViewById(ID_ANDROID_CONTENT);
    if (contentParent == null) {
        throw new RuntimeException("Window couldn't find content container view");
    }
}
到此,Actvity的绘制完成
View的视图绘制流程剖析
- DecorView被加载到Window中
在ActivityThread的 handleResumeActivity() 方法中通过WindowManager将DecorView加载到Window中,通过ActivityThread中一下代码可以得到应征
final void handleResumeActivity(IBinder token,
        boolean clearHide, boolean isForward, boolean reallyResume, int seq, String reason) {
      ...
      //在此处执行Activity的onResume方法
    r = performResumeActivity(token, clearHide, reason);
    if (r != null) {
        final Activity a = r.activity;
        if (localLOGV) Slog.v(
            TAG, "Resume " + r + " started activity: " +
            a.mStartedActivity + ", hideForNow: " + r.hideForNow
            + ", finished: " + a.mFinished);
        final int forwardBit = isForward ?
                WindowManager.LayoutParams.SOFT_INPUT_IS_FORWARD_NAVIGATION : 0;
        boolean willBeVisible = !a.mStartedActivity;
        if (!willBeVisible) {
            try {
                willBeVisible = ActivityManagerNative.getDefault().willActivityBeVisible(
                        a.getActivityToken());
            } catch (RemoteException e) {
                throw e.rethrowFromSystemServer();
            }
        }
        if (r.window == null && !a.mFinished && willBeVisible) {
            //获取window对象
            r.window = r.activity.getWindow();
            //获取DecorView
            View decor = r.window.getDecorView();
            decor.setVisibility(View.INVISIBLE);
            //获取WindowManager,在这里getWindowManager()实质上获取的是ViewManager的子类对象WindowManager
            ViewManager wm = a.getWindowManager();
            WindowManager.LayoutParams l = r.window.getAttributes();
            a.mDecor = decor;
            l.type = WindowManager.LayoutParams.TYPE_BASE_APPLICATION;
            l.softInputMode |= forwardBit;
            if (r.mPreserveWindow) {
                a.mWindowAdded = true;
                r.mPreserveWindow = false;
                 //获取ViewRootImpl对象
                ViewRootImpl impl = decor.getViewRootImpl();
                if (impl != null) {
                    impl.notifyChildRebuilt();
                }
            }
            if (a.mVisibleFromClient && !a.mWindowAdded) {
                a.mWindowAdded = true;
                //在这里WindowManager将DecorView添加到PhoneWindow中
                wm.addView(decor, l);
            }
        }
总结:在ActivityThread的handleResumeActivity方法中WindowManager将DecorView添加到PhoneWindow中,addView()方法执行时将视图添加的动作交给了ViewRootImpl处理,最后在ViewRootImpl的performTraversals中开始View树的绘制
ViewRootImpl的performTraversals()方法完成具体的视图绘制流程
private void performTraversals() {
    if (!mStopped || mReportNextDraw) {
        ...
        int childWidthMeasureSpec = getRootMeasureSpec(mWidth, lp.width);
        int childHeightMeasureSpec = getRootMeasureSpec(mHeight, lp.height);
          ...
         // Ask host how big it wants to be
         //View绘制:开始测量 View的测量时递归逐层测量,由父布局与子布局共同确认子View的测量模式,在子布局测量完毕时确认副布局的宽高,
         //在此方法执行完毕后才可获取到View的宽高,否侧获取的宽高都为0
        performMeasure(childWidthMeasureSpec, childHeightMeasureSpec);
       }
    if (didLayout) {
    //开始摆放,该方法是ViewGroup中的方法,例如 LinerLayout...
        performLayout(lp, mWidth, mHeight);
    }
    if (!cancelDraw && !newSurface) {
        //开始绘制,执行View的onDraw()方法
        performDraw();
    }
}
下面开始对performMeasure(),performLayout(),performDraw()进行解析
- performMeasure()
private void performMeasure(int childWidthMeasureSpec, int childHeightMeasureSpec) {
    Trace.traceBegin(Trace.TRACE_TAG_VIEW, "measure");
    try {
        mView.measure(childWidthMeasureSpec, childHeightMeasureSpec);
    } finally {
        Trace.traceEnd(Trace.TRACE_TAG_VIEW);
    }
}
通过以上这段代码,我们可以看到两个重要的参数 childWidthMeasureSpec,childHeightMeasureSpec,这两个Int类型的参数包含了View的测量模式和宽高信息,因此在onMeasure()方法中我们可以通过该参数获取到测量模式,和宽高信息,我们在onMeasue中设置宽高信息也是通过MeasureSpec设置,
 */
public static class MeasureSpec {
    //int类型占4个字节,其中高2位表示尺寸测量模式,低30位表示具体的宽高信息
    private static final int MODE_SHIFT = 30;
    private static final int MODE_MASK  = 0x3 << MODE_SHIFT;
    /** @hide */
    @IntDef({UNSPECIFIED, EXACTLY, AT_MOST})
    @Retention(RetentionPolicy.SOURCE)
    public @interface MeasureSpecMode {}
    //如下所示是MeasureSpec中的三种模式:UNSPECIFIED、EXACTLY、AT_MOST
    //UNSPECIFIED:未指定模式,父容器不限制View的大小,一般用于系统内部的测量
    public static final int UNSPECIFIED = 0 << MODE_SHIFT;
    //AT_MOST:最大模式,对应于在xml文件中指定控件大小为wrap_content属性,子View的最终大小是父View指定的大小值,并且子View的大小不能大于这个值
    public static final int EXACTLY     = 1 << MODE_SHIFT;
    //EXACTLY :精确模式,对应于在xml文件中指定控件为match_parent属性或者是具体的数值,父容器测量出View所需的具体大小
    public static final int AT_MOST     = 2 << MODE_SHIFT;
    //获取测量模式
    @MeasureSpecMode
    public static int getMode(int measureSpec) {
        //noinspection ResourceType
        return (measureSpec & MODE_MASK);
    }
   //获取宽高信息
    public static int getSize(int measureSpec) {
        return (measureSpec & ~MODE_MASK);
    }
     ...
}
performMeasure()会继续调用mView.measure()方法
 public final void measure(int widthMeasureSpec, int heightMeasureSpec) {
        boolean optical = isLayoutModeOptical(this);
        if (optical != isLayoutModeOptical(mParent)) {
            Insets insets = getOpticalInsets();
            int oWidth  = insets.left + insets.right;
            int oHeight = insets.top  + insets.bottom;
            //根据原有宽高计算获取不同模式下的具体宽高值
            widthMeasureSpec  = MeasureSpec.adjust(widthMeasureSpec,  optical ? -oWidth  : oWidth);
            heightMeasureSpec = MeasureSpec.adjust(heightMeasureSpec, optical ? -oHeight : oHeight);
        }
        ...
        if (forceLayout || needsLayout) {
            // first clears the measured dimension flag
            mPrivateFlags &= ~PFLAG_MEASURED_DIMENSION_SET;
            resolveRtlPropertiesIfNeeded();
            int cacheIndex = forceLayout ? -1 : mMeasureCache.indexOfKey(key);
            if (cacheIndex < 0 || sIgnoreMeasureCache) {
                // measure ourselves, this should set the measured dimension flag back
                //在该方法中子控件完成具体的测量
                onMeasure(widthMeasureSpec, heightMeasureSpec);
                ...
            }
         ...
    }
从上述代码片段中可以看到执行到了onMeasure()方法,如果该控件为View的话,测量到此结束,如果是ViewGroup的话,会继续循环获取所有子View,调用子View的measure方法,下面以LinearLayout为例,继续看
@Override
protected void onMeasure(int widthMeasureSpec, int heightMeasureSpec) {
    if (mOrientation == VERTICAL) {
        measureVertical(widthMeasureSpec, heightMeasureSpec);
    } else {
        measureHorizontal(widthMeasureSpec, heightMeasureSpec);
    }
}
LinearLayout通过不同的摆放布局执行不同的测量方法,以measureVertical为例,向下看
void measureVertical(int widthMeasureSpec, int heightMeasureSpec) {
    //获取子View的个数
    final int count = getVirtualChildCount();
        ...
    //循环获取所有子View
    for (int i = 0; i < count; ++i) {
        //获取子View
        final View child = getVirtualChildAt(i);
        //调用子View的measure方法
        child.measure(childWidthMeasureSpec, childHeightMeasureSpec);
    }
    ....
}
至此,View的测量流程结束
View的layout流程分析
private void performLayout(WindowManager.LayoutParams lp, int desiredWindowWidth,
        int desiredWindowHeight) {
        final View host = mView;
          // 在此处调用mView的layout()摆放开始
        host.layout(0, 0, host.getMeasuredWidth(), host.getMeasuredHeight());
     }
 /*
 *@param l view 左边缘相对于父布局左边缘距离
 *@param t view 上边缘相对于父布局上边缘位置
 *@param r view 右边缘相对于父布局左边缘距离
 *@param b view 下边缘相对于父布局上边缘距离
 */
public void layout(int l, int t, int r, int b) {
      ...
   //记录 view 原始位置
    int oldL = mLeft;
    int oldT = mTop;
    int oldB = mBottom;
    int oldR = mRight;
  //调用 setFrame 方法 设置新的 mLeft、mTop、mBottom、mRight 值,
  //设置 View 本身四个顶点位置
  //并返回 changed 用于判断 view 布局是否改变
    boolean changed = isLayoutModeOptical(mParent) ?
            setOpticalFrame(l, t, r, b) : setFrame(l, t, r, b);
 //第二步,如果 view 位置改变那么调用 onLayout 方法设置子 view 位置
    if (changed || (mPrivateFlags & PFLAG_LAYOUT_REQUIRED) == PFLAG_LAYOUT_REQUIRED) {
        //开始调用 onLayout  在此处根据子View的宽高及相关规则进行摆放
        onLayout(changed, l, t, r, b);
          ...
            }
        }
    }
}
View的Draw流程分析
private void performDraw() {
        ...
          //调用draw方法
        draw(fullRedrawNeeded);
        ...
    }
private void draw(boolean fullRedrawNeeded) {
        ...
     //View的绘制流程调用的   drawSoftware() 该方法
if (!drawSoftware(surface, mAttachInfo, xOffset, yOffset, scalingRequired, dirty)) {
    return;
}
private boolean drawSoftware(Surface surface, AttachInfo attachInfo, int xoff, int yoff,
        boolean scalingRequired, Rect dirty) {
    final Canvas canvas;
       ...
    //初始化画布
    canvas = mSurface.lockCanvas(dirty);
    ...
    //开始调用ViewGroup 和  View的draw方法
    mView.draw(canvas);
    ...
}
public void draw(Canvas canvas) {
    drawBackground(canvas);
    //ViewGroup  默认是不会调用OnDraw方法的
    if (!dirtyOpaque) onDraw(canvas);
    //这个方法主要是ViewGroup循环调用 drawChild()进行对子View的绘制
    dispatchDraw(canvas);
}
protected void onDraw(Canvas canvas) {
}
View的onDraw方法只是一个模版,具体实现方式,交由我们这些开发者去进行实现
至此,View的绘制流程完毕
- requestLayout重新绘制视图
子View调用requestLayout方法,会标记当前View及父容器,同时逐层向上提交,直到ViewRootImpl处理该事件,ViewRootImpl会调用三大流程,从measure开始,对于每一个含有标记位的view及其子View都会进行测量、布局、绘制。
- invalidate在UI线程中重新绘制视图
当子View调用了invalidate方法后,会为该View添加一个标记位,同时不断向父容器请求刷新,父容器通过计算得出自身需要重绘的区域,直到传递到ViewRootImpl中,最终触发performTraversals方法,进行开始View树重绘流程(只绘制需要重绘的视图)。
- postInvalidate在非UI线程中重新绘制视图
这个方法与invalidate方法的作用是一样的,都是使View树重绘,但两者的使用条件不同,postInvalidate是在非UI线程中调用,invalidate则是在UI线程中调用。
以上就是Android自定义View绘制流程详解的详细内容,更多关于Android View绘制的资料请关注好代码网其它相关文章!