Angular的日常工作中经常会使用到ng-template和ng-container,本文对他们做一个总结。
ng-template
ng-template是一个Angular元素,它不会直接显示出来。在渲染视图之前,Angular会把它的内容替换为一个注释。ng-template是用来定义模板的,当定义好一个模板之后,可以用ng-container和ngTemplateOutlet指令来进行使用。
简单点来说,就是定义了一个模板片段,并且起了一个名字,在需要的时候可以通过名字来使用这个片段。
<!--定义模板,并不会在视图中显示-->
<ng-template #loading>
  <div class="waiting-wrap">
    <div class="spinner">loading...</div>
  </div>
</ng-template>

<!--使用模板,在视图中显示-->
<ng-container *ngTemplateOutlet="loading"></ng-container>
<ng-template #myTemp>
<div>Hello, Tom?</div>
</ng-template>
<div class="container">
<ng-container *ngTemplateOutlet="myTemp"></ng-container>
<div [ngTemplateOutlet]="myTemp">
Jerry
</div>
</div>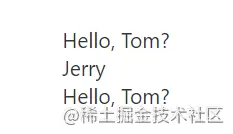
作用域的Template
带作用域的Template,可以从当前作用域获得数据。
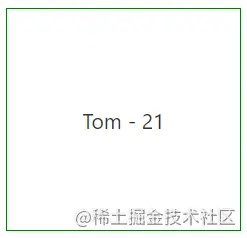
<ng-template #userTemp let-account="name" let-age="age">
    <p>{{account}} - {{age}}</p>
</ng-template>

<ng-container *ngTemplateOutlet="userTemp; context: userInfo">
</ng-container>
上面的let-account="name",相当于定义了一个account变量,变量的值为 context.name。也就是下面的代码:
let account = context.name;
let age = context.age;
import { AfterViewInit, Component, ComponentFactory, ComponentFactoryResolver, ComponentRef, EventEmitter, Input, OnChanges, OnInit, Output, SimpleChanges, TemplateRef, ViewChild, ViewContainerRef } from '@angular/core';
import { MsgComponent } from '../msg/msg.component';

@Component({
  selector: 'app-user',
  templateUrl: './user.component.html',
  styleUrls: ['./user.component.scss']
})
export class UserComponent implements OnInit, OnChanges, AfterViewInit {
  userInfo: any;

  constructor() {}

  ngOnInit(): void {
    this.userInfo = {
      name: 'Tom',
      age: 21
    };

    // this.createComponent();
  }
}
TemplateRef
TemplateRef实例用于表示模板对象。如果我在模板里定义了一个ng-template,想在组件中访问它,这时候就用到了TemplateRef。
<!--定义模板,并不会在视图中显示-->
<ng-template #myTemp>
   <div>Hello, Tom?</div>
</ng-template>
export class UserComponent implements OnInit, OnChanges, AfterViewInit {
  @ViewChild('myTemp', { read: TemplateRef}) temp1!: TemplateRef<any>;
  ......
}
TemplateRef:
Represents an embedded template that can be used to instantiate embedded views. To instantiate embedded views based on a template, use the ViewContainerRef method createEmbeddedView().
TemplateRef就是ng-template的实例。后面会说怎么和ng-container的实例搭配使用。
ng-container
ng-container是Angular的一个特殊标签,它和ng-template完全不同。
- ng-template只是定义了一个视图片段的模板,并不会直接在视图中展示出来(会显示为注释);
- ng-container可以在视图中展示出来,其本身并没有创建任何节点,只是作为一个逻辑Tag来使用;
<ng-template #myTemp>
    <div>Hello, Tom?</div>
</ng-template>

<div class="container">
  <ng-container #container1>
    Jerry
  </ng-container>
</div>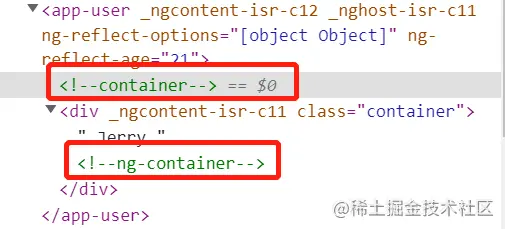
在Vue2中,我们定义一个组件,但是这个组件的视图中必须有一个根元素,如果有多个根元素,就会报错。是因为,任何Vue组件的实例需要绑定到一个单一DOM元素上。
<template>
  <!--报错-->
  <div>
    Tom
  </div>
  <div>
    {{age}}
  </div>
</template>

<template>
  <!--正确-->
  <div>
     <div>
        Tom
    </div>
    <div>
        {{age}}
    </div>
  </div>
 </template>
但是有些情况下,我们就是不想有外层元素包裹,那怎么办呢?Vue3中改善了这一点,直接可以写上面的模板,并不会报错,原因是在模板编译的时候自动添加了Fragment虚拟元素。
在React中也会有同样的问题,解决方案就是一个名为Fragment的虚拟元素。
class Columns extends React.Component {
  render() {
    return (<React.Fragment>
        <td>Hello</td>
        <td>World</td>
      </React.Fragment>
        );
    }
}
尽管Fragment看起来像一个普通的DOM元素,但它是虚拟的,根本不会在DOM树中呈现。这样我们可以将组件实例绑定到一个单一的元素中,而不需要创建一个多余的DOM节点。
Angular中的ng-container可以看做是Vue,React中的Fragment。
<ul>
  <ng-container *ngFor="let item of listdata">
    <li>
      {{item.id}}---{{item.name}}
    </li>
  </ng-container>
</ul>
那如果我想在组件代码中操作ng-container的实例呢?
场景:比如在一些复杂场景中,根据不同情况将不同的ng-template插入到ng-container中。
<ng-template #myTemp>
    <div>Hello, Tom?</div>
</ng-template>

<div class="container">
    <ng-container #container1>
        Jerry
    </ng-container>
</div>
export class UserComponent implements OnInit, OnChanges, AfterViewInit {
// 需要加上{ read: TemplateRef}, { read: ViewContainerRef}
// 否则会当成普通element
@ViewChild('myTemp', { read: TemplateRef}) temp1!: TemplateRef<any>;
@ViewChild('container1', { read: ViewContainerRef}) container1!: ViewContainerRef;
ngAfterViewInit(): void {
console.log(this.temp1);
this.container1?.createEmbeddedView(this.temp1);
}
}
动态创建Component
说到ng-container,就不得不提下动态创建Component。
现在有一个组件MsgComponent,我们想在UserComponent中动态创建出这个Component。
import { Component, OnInit } from '@angular/core';
@Component({
    selector: 'app-msg',
    template: '<h2>消息:{{msg}}</h2>'
})
export class MsgComponent implements OnInit {
    msg?: string = 'Hello';
    constructor() { }

    ngOnInit() { }
}
还要把这个MsgComponent在NgModule的entryComponents里注册一下。当然也可以在Component的entryComponents里注册一下也行。
@NgModule({
  declarations: [
    AppComponent,
    UserComponent
  ],
  imports: [
    BrowserModule
  ],
  entryComponents: [
    MsgComponent
  ],
  bootstrap: [AppComponent]
})
export class AppModule { }
在User组件的template中,需要指定一个“放”MsgComponent的地方,也就是ng-container。
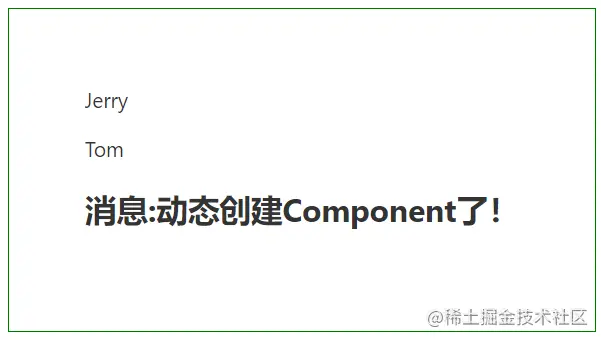
<div class="container">
  <ng-container #container1>
    Jerry
    <p>Tom</p>
  </ng-container>
</div>
import { AfterViewInit, Component, ComponentFactory, ComponentFactoryResolver, ComponentRef, EventEmitter, Input, OnChanges, OnInit, Output, SimpleChanges, TemplateRef, ViewChild, ViewContainerRef } from '@angular/core';
import { MsgComponent } from '../msg/msg.component';
@Component({
selector: 'app-user',
templateUrl: './user.component.html',
styleUrls: ['./user.component.scss']
})
export class UserComponent implements OnInit, OnChanges, AfterViewInit {
@ViewChild('container1', { read: ViewContainerRef, static: true}) container1!: ViewContainerRef;
constructor(private _resolveSvc: ComponentFactoryResolver) {
}
ngOnInit(): void {
// console.log('user: ngOnInit');
// this.userID = this.options.id;
this.createComponent();
}
createComponent(): void {
let fac: ComponentFactory<MsgComponent> = this._resolveSvc.resolveComponentFactory(MsgComponent);
// this.container1.clear();
let msgComp: ComponentRef<MsgComponent> = this.container1.createComponent(fac);
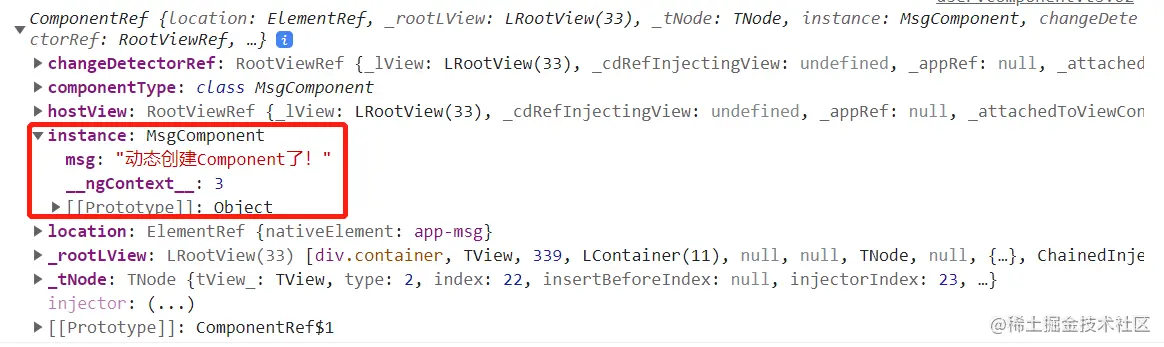
msgComp.instance.msg = '动态创建Component了!';
}
ngAfterViewInit(): void {
// this.createComponent(); // { static: false}
}
}ComponentFactoryResolver是Angular里组件工厂解析器,把这个Service注入进来就可以使用了。resolveComponentFactory接收一个Component类型,生成一个ComponentFactory对象,为什么需要这个ComponentFactory,直接用Component类型不行吗?因为一个类型其实就是一个Class类,不足以描述一个Component,Component还有selector,inputs,output等,而这个ComponentFactory就包含了这些信息。这里用到了设计模式中的“工厂模式”,输入一个Component Class,输出一个对应于这个ComponentFactory具体信息。
createComponent比较好理解了,基于ComponentFactory具体信息,创建一个Component,并把这个Component添加到指定的容器里,还可以指定添加的位置。返回值是组件对象,注意这里是组件对象,并不是组件Class的实例,Class的实例在组件对象的instance属性上。
如果有需要,可以清空容器。
this.container1.clear();
这里的{ static: true}并不是必须的,也可以不写static,那就用默认值false。这个static之前说过,如果是false的话,由于在ngOnInit生命周期钩子的时刻比较早,所以这时候无法访问到this.container1,就会报错。那static是false的情况下,应该做实现呢?可以在ngAfterViewInit这个钩子中实现。
ngAfterViewInit(): void {
  this.createComponent();
}
但是不建议上面的写法,因为在ngAfterViewInit里说明View已经完成,这里不建议再次操作View,会影响性能,尽管这样并不会报错。那我就是想在这里再次操作View呢?可以把更新推迟到下一个更新周期。
ngAfterViewInit(): void {
  setTimeout(() => {
      this.createComponent();
  });

  asyncScheduler.schedule(() => {
     this.createComponent();
  });
}
有没有感觉上面动态创建Component的过程有点复杂,开发者其实并不关心ComponentFactoryResolver,ComponentFactory这些细节,给你一个Component类型,给我创建出来Component实例就行了。在Angular13中,就对这个地方做了简化,不在需要ComponentFactoryResolver,ComponentFactory了。
import { AfterViewInit, Component, ComponentFactory, ComponentFactoryResolver, ComponentRef, EventEmitter, Input, OnChanges, OnInit, Output, SimpleChanges, TemplateRef, ViewChild, ViewContainerRef } from '@angular/core';
import { MsgComponent } from '../msg/msg.component';

@Component({
  selector: 'app-user',
  templateUrl: './user.component.html',
  styleUrls: ['./user.component.scss']
})
export class UserComponent implements OnInit, OnChanges, AfterViewInit {
  @ViewChild('container1', { read: ViewContainerRef, static: true}) container1!: ViewContainerRef;

  // 无需注入ComponentFactoryResolver
  constructor() {
  }

  ngAfterViewInit(): void {
    // this.createComponent();
  }

  ngOnInit(): void {
    this.createComponent();
  }

  createComponent(): void {
    // V13简化
    let msgComp: ComponentRef<MsgComponent> = this.container1.createComponent(MsgComponent);
    msgComp.instance.msg = 'V13动态创建Component了!';
  }
}
大功告成!

到此这篇关于Angular中ng-template和ng-container的应用小结的文章就介绍到这了,更多相关Angular中ng-template和ng-container内容请搜索好代码网以前的文章或继续浏览下面的相关文章希望大家以后多多支持好代码网!