Prototype模式是提供自我复制的功能。包括浅拷贝和深拷贝。
一、Prototype模式的用途
场景1:游戏场景中有很多类似的敌人,它们的技能都一样,但是
Prototype模式是提供自我复制的功能。包括浅拷贝和深拷贝。
一、Prototype模式的用途
场景1:游戏场景中有很多类似的敌人,它们的技能都一样,但是随着敌人出现的位置和不同,它们的能力也不太一样。那么,可以创建一个敌人抽象类,然后对于不同能力的步兵创建不同的子类。然后,使用工厂模式让调用方依赖敌人抽象类。问题来了,如果有无数种能力不同的步兵,难道需要创建无数子类吗?还有步兵模式的初始化工作比较耗时,创建这么多步兵对象可能会浪费更多的时间。我们是不是只创建一个步兵模式,然后复制出更多的一模一样的步兵呢?复制后,只需要调整一下这些对象在地图出现的位置,或者调整一下他们的能力及其他特性即可。原型模式可以用来解决这类问题的。
场景2:在商品房销售系统中,房屋信息是基础信息。在系统运行前必须输入房屋的各种信息到系统中,这是一项枯燥的重复劳动。如果让用户重复输入房间的类型、面积和卫生间样式,这个系统肯定尚未运行就夭折了。实际上,一个小区楼盘的样式并不多,不同的只是楼号。另外,楼盘中的房间类型也非常有限,从而为解决输入问题提供了启示。所以我们可以事先创建一个楼盘模型,然后复制出更多的楼盘模型。复制后,只需要调整一下楼号等信息即可。原型模式也可以用来解决这类问题。
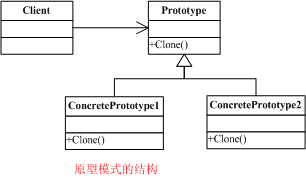
二、Portotype模式的结构
三、代码如下
Java代码
吕震宇老师的例子很容易理解,故直接引用如下:
 // Prototype pattern -- Structural example using System;// "Prototype"abstract class Prototype

 {
{ // Fields private string id; // Constructors public Prototype( string id )
 { this.id = id;
 } public string Id { get{ return id; } } // Methods abstract public Prototype Clone();
 }// "ConcretePrototype1"class ConcretePrototype1 : Prototype{ // Constructors public ConcretePrototype1( string id ) : base ( id ) {} // Methods override public Prototype Clone() { // Shallow copy return (Prototype)this.MemberwiseClone(); }}// "ConcretePrototype2"class ConcretePrototype2 : Prototype{ // Constructors public ConcretePrototype2( string id ) : base ( id ) {} // Methods override public Prototype Clone() { // Shallow copy return (Prototype)this.MemberwiseClone(); }}/**//// <summary>/// Client test/// </summary>class Client{ public static void Main( string[] args ) { // Create two instances and clone each ConcretePrototype1 p1 = new ConcretePrototype1( "I" ); ConcretePrototype1 c1 = (ConcretePrototype1)p1.Clone(); Console.WriteLine( "Cloned: {0}", c1.Id ); ConcretePrototype2 p2 = new ConcretePrototype2( "II" ); ConcretePrototype2 c2 = (ConcretePrototype2)p2.Clone(); Console.WriteLine( "Cloned: {0}", c2.Id ); }}
C++代码
- class CPrototype
- {
- public:
- virtual ~CPrototype() { }
- virtual CPrototype* Clone() = 0;
- };
-
- class CConcretePrototype1 : public CPrototype
- {
- public:
- CConcretePrototype1()
- {
- printf("[CConcretePrototype1] 构造函数. \n");
- }
- ~CConcretePrototype1()
- {
- printf("[CConcretePrototype1] 析构函数. \n");
- }
- public:
- virtual CPrototype* Clone() { return new CConcretePrototype1(*this); }
- private:
- // 既然有Clone函数,就将复制构成函数设置为私有的
- CConcretePrototype1(const CConcretePrototype1& rhs)
- {
- printf("[CConcretePrototype1] 复制构造函数. \n");
- }
- };
-
- class CConcretePrototype2 : public CPrototype
- {
- public:
- CConcretePrototype2()
- {
- printf("[CConcretePrototype2] 构造函数. \n");
- }
- ~CConcretePrototype2()
- {
- printf("[CConcretePrototype2] 析构函数. \n");
- }
- public:
- virtual CPrototype* Clone() { return new CConcretePrototype2(*this); }
- private:
- // 既然有Clone函数,就将复制构成函数设置为私有的
- CConcretePrototype2(const CConcretePrototype2& rhs)
- {
- printf("[CConcretePrototype2] 复制构造函数. \n");
- }
- };
测试Demo代码
- void PrototypeDemo()
- {
- CPrototype* pItem = new CConcretePrototype1();
- CPrototype* pItem2 = pItem->Clone();
- CPrototype* pItem3 = pItem->Clone();
-
- delete pItem3;
- delete pItem2;
- delete pItem;
- }
转:http://www.cnblogs.com/feipeng/archive/2007/03/13/672791.html