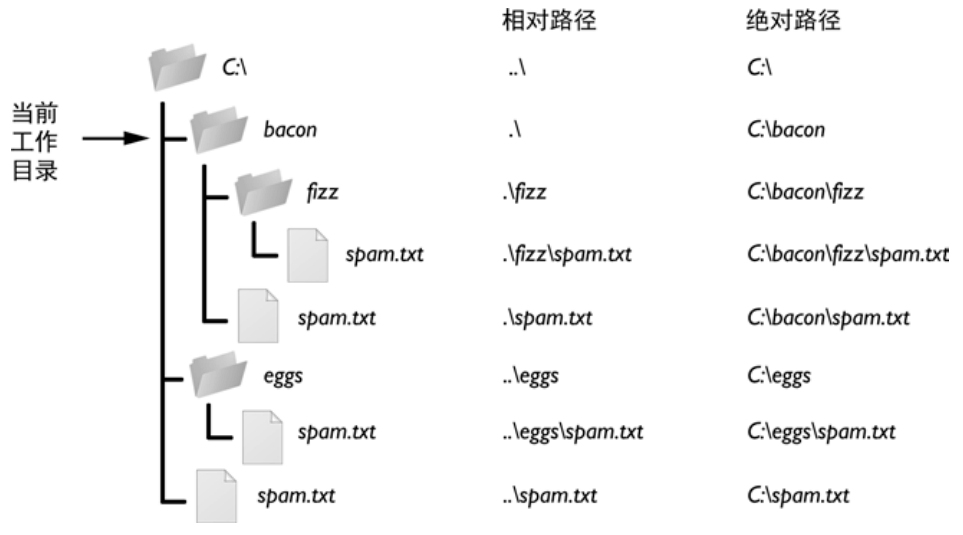
又是一场大雪过后,天空像海一样蔚蓝,甚至比海更加晶莹剔透。千峰万岭,极目望去,尽是白色,闪耀着一片连接不断的银光。山顶积雪未融,如白银宫网。
import time
import tkinter as tkclass Window:
 def __init__(self, title="nms", width=300, height=120, staFunc=bool, stoFunc=bool):
 self.w = width
 self.h = height
 self.stat = True
 self.staFunc = staFunc
 self.stoFunc = stoFunc
 self.staIco = None
 self.stoIco = None self.root = tk.Tk(className=title) def center(self):
 ws = self.root.winfo_screenwidth()
 hs = self.root.winfo_screenheight()
 x = int( (ws/2) - (self.w/2) )
 y = int( (hs/2) - (self.h/2) )
 self.root.geometry('{}x{}+{}+{}'.format(self.w, self.h, x, y)) def packBtn(self):
 self.btnSer = tk.Button(self.root, command=self.event, width=15, height=3)
 self.btnSer.pack(padx=20, side='left')
 btnQuit = tk.Button(self.root, text='关闭窗口', command=self.root.quit, width=15, height=3)
 btnQuit.pack(padx=20, side='right') def event(self):
 self.btnSer['state'] = 'disabled'
 if self.stat:
 if self.stoFunc():
 self.btnSer['text'] = '启动服务'
 self.stat = False
 self.root.iconbitmap(self.stoIco)
 else:
 if self.staFunc():
 self.btnSer['text'] = '停止服务'
 self.stat = True
 self.root.iconbitmap(self.staIco)
 self.btnSer['state'] = 'active' def loop(self):
 self.root.resizable(False, False) #禁止修改窗口大小
 self.packBtn()
 self.center() #窗口居中
 self.event()
 self.root.mainloop()########################################################################
def sta():
 print('start.')
 return True
def sto():
 print('stop.')
 return Trueif __name__ == '__main__':
 import sys, os w = Window(staFunc=sta, stoFunc=sto)
 w.staIco = os.path.join(sys.exec_prefix, 'DLLs\pyc.ico')
 w.stoIco = os.path.join(sys.exec_prefix, 'DLLs\py.ico')
 w.loop()
以上就是python3使用tkinter实现ui界面简单实例。成功是一个过程,并不是一个结果。更多关于python3使用tkinter实现ui界面简单实例请关注haodaima.com其它相关文章!