引言
小编最近在项目中实现相机识别人脸的功能,将 Android 封装的控件 view 进行中转,制作成 FlutterPlugin 提供给 flutter 项目使用。为了方便后期的知识整理,下面,用简单的 demo 记录 Android 控件如何封装成 flutter 插件以及如何实现交互的过程。
1. FlutterPlugin 创建
第一步,创建一个 FlutterPlugin 项目。
2. 创建 Android 控件
抛砖引玉,创建一个简单的自定义控件,控件内包含三个元素
layout_custom_view.xml (布局文件)
<?xml version="1.0" encoding="utf-8"?>
<RelativeLayout xmlns:android="http://schemas.android.com/apk/res/android"
    android:layout_width="match_parent"
    android:layout_height="match_parent">
    <Button
        android:id="@+id/androidViewButton"
        android:layout_width="wrap_content"
        android:layout_height="wrap_content"
        android:layout_centerInParent="true"
        android:padding="20dp"
        android:text="发送数据给 flutter" />
    <!--用于展示从flutter层接收的数据-->
    <TextView
        android:id="@+id/androidViewText"
        android:layout_width="wrap_content"
        android:layout_height="wrap_content"
        android:layout_below="@id/androidViewButton"
        android:layout_centerHorizontal="true"
        android:padding="20dp"
        android:text="" />
    <TextView
        android:layout_width="wrap_content"
        android:layout_height="wrap_content"
        android:layout_alignParentBottom="true"
        android:layout_centerHorizontal="true"
        android:paddingBottom="10dp"
        android:text="Android-View"
        android:textSize="20dp"
        android:textStyle="bold" />
</RelativeLayout>
CustomView.kt
/**
 *  android 渲染的自定义view 提供 flutter 使用
 */
class CustomView(context: Context, attrs: AttributeSet?) : FrameLayout(context, attrs) {
    private var textView: TextView? = null
    private var onKeyEventCallback: OnKeyEventCallback? = null
    init {
        val rootView = LayoutInflater.from(context).inflate(R.layout.layout_custom_view, this, true)
        initView(rootView)
    }
    private fun initView(rootView: View) {
        textView = rootView.findViewById(R.id.androidViewText)
        rootView.findViewById<Button>(R.id.androidViewButton).setOnClickListener {
            //模拟生成一个随机数传递到 flutter
            val randomNum = (0..10).random()
            onKeyEventCallback?.onKeyEventCallback(randomNum.toString())
        }
    }
    fun setOnKeyEventCallback(callback: OnKeyEventCallback?) {
        onKeyEventCallback = callback
    }
    @SuppressLint("SetTextI18n")
    fun getMessageFromFlutter(message: String) {
        textView?.text = "自来flutter的数据:$message"
    }
}
interface OnKeyEventCallback {
    fun onKeyEventCallback(message: String)
}
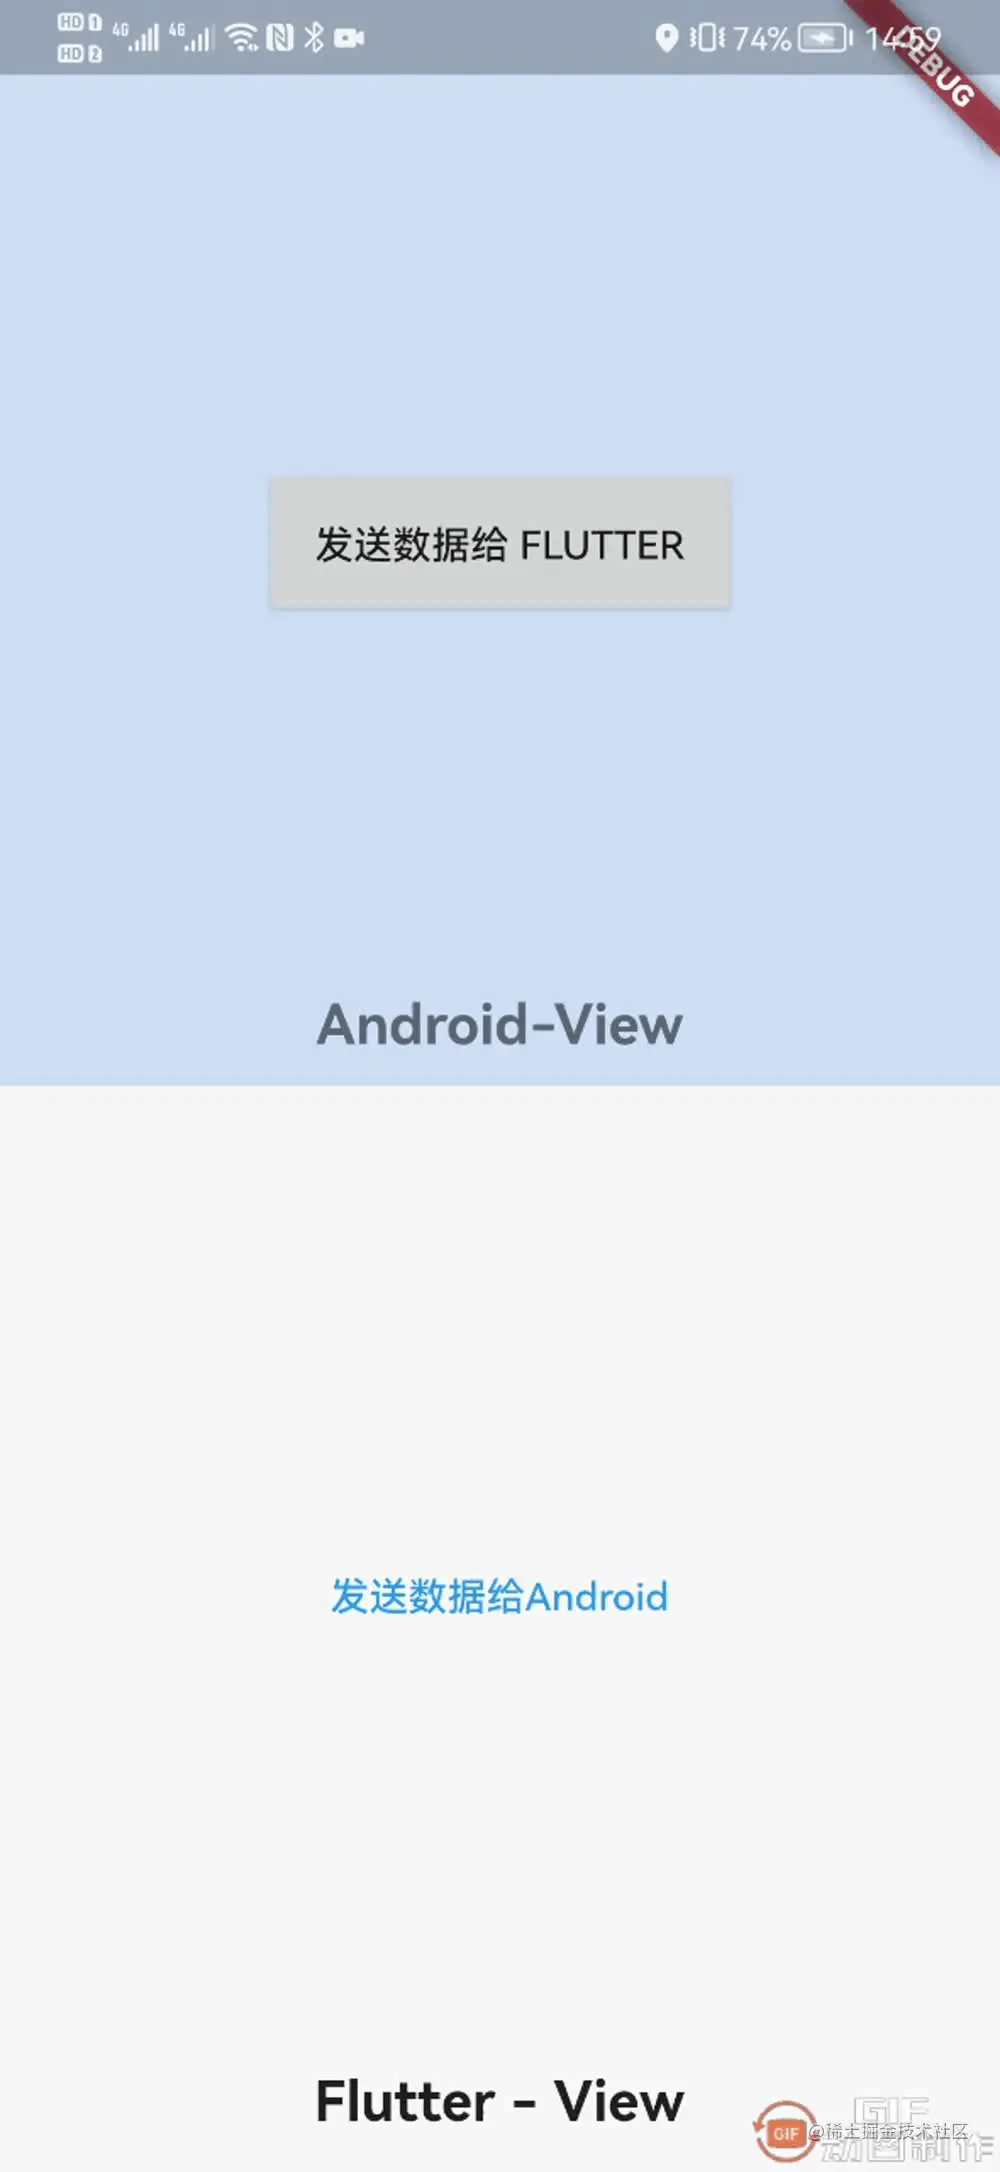
自定义控件进行UI绘制,显示文本 Android-View。为了模拟双向交互流程,控件内放置了一个按钮用于生成随机数模拟 android 层向 flutter 层的数据传输;放置了一块文本区域用于展示从 flutter 层接收到的数据。
3. 注册 Android 控件
在 plugin 的 onAttachToEngine 方法中对自定义控件进行注册
class CustomAndroidViewPlugin: FlutterPlugin, ActivityAware {
  override fun onAttachedToEngine(@NonNull flutterPluginBinding: FlutterPlugin.FlutterPluginBinding) {
    /// 将 Android 控件进行注册,提供 flutter 层使用
    flutterPluginBinding.platformViewRegistry
      .registerViewFactory(
        VIEW_TYPE_ID,
        CustomViewFactory(flutterPluginBinding.binaryMessenger)
      )
  }
 ...省略部分非关键代码
  companion object {
    // 通过唯一值id进行控件注册
    private const val VIEW_TYPE_ID = "com.rex.custom.android/customView"
  }
}
实际注册的对象 CustomViewFactory 代码如下:
class CustomViewFactory(
    private val messenger: BinaryMessenger
) : PlatformViewFactory(StandardMessageCodec.INSTANCE) {
    override fun create(
        context: Context?,
        viewId: Int,
        args: Any?
    ): PlatformView {
        @Suppress("UNCHECKED_CAST")
        val params = args as HashMap<String, Any>
        return CustomViewController(
            context = requireNotNull(context),
            id = viewId,
            messenger = messenger,
            params = params
        )
    }
}
4. 封装 Android 层通信交互 ‘CustomViewController’
/**
 * 提供 AndroidView 与 flutter 间的交互能力
 */
class CustomViewController(
    private val context: Context,
    messenger: BinaryMessenger,
    val id: Int,
    val params: HashMap<String, Any>
) : PlatformView {
    private var customView: CustomView? = null
    private val channel: MethodChannel = MethodChannel(
        messenger, "com.rex.custom.android/customView$id"
    )
    init {
        // 如果需要在自定义view交互中申请监听权限可以加上下面这句话
        // CustomShared.binding?.addRequestPermissionsResultListener(this)
        channel.setMethodCallHandler(this)
        params.entries.forEach {
            Log.i("rex", "CustomView初始化接收入参:${it.key} - ${it.value}")
        }
    }
    override fun getView(): View = initCustomView()
    private fun initCustomView(): View {
        if (customView == null) {
            customView = CustomView(context, null)
            customView!!.setOnKeyEventCallback(object : OnKeyEventCallback {
                override fun onKeyEventCallback(message: String) {
                    // 将 Android 层的数据传递到 flutter 层
                    channel.invokeMethod(
                        "getMessageFromAndroidView",
                        "native - $message"
                    )
                }
            })
        }
        return customView!!
    }
    override fun dispose() {
        // flutterView dispose 生命周期 在此响应
        Log.i("rex", "flutterView on Dispose")
    }
    override fun onMethodCall(call: MethodCall, result: MethodChannel.Result) {
        when (call.method) {
            "getMessageFromFlutterView" -> {
                customView?.getMessageFromFlutter(call.arguments.toString())
                result.success(true)
            }
            else -> result.notImplemented()
        }
    }
}
代码说明
- CustomViewController 需实现 PlatformView 实现 getView 方法返回 自定义UI控件。
- 通过 MethodChannel 实现 Android - Flutter 间的交互通信能力。
- Android代码中,自定义控件如何接收 flutter 端的方法调用? 在 onMethodCall 方法中接收来自 flutter 端的方法调用,通过方法名区分,调用指定功能。如:示例中的
getMessageFromFlutterView接收 flutter 端传递的数据call.arguments,然后在自定义 Android-UI 控件中展示出来customView.getMessageFromFlutter。 - Android代码中,自定义控件如何调用 flutter 端方法? 使用方法
channel.invokeMethod(param1, param2),param1 为约定的方法名称,如示例中的getMessageFromAndroidView, 生成一个随机数传递给 flutter 端;param2 为 想要传递给 flutter 端的数据,数据类型可以是任意类型,示例中使用的是字符串类型。
5. 在 flutter 中如何使用已注册的 Android 控件(view)
创建 custom_android_view.dart 用于包裹 Android 控件
关键点:通过原生层中注册的 id 路径获取 AndroidView 要求:AndroidView 中 viewType 参数就是原生层中注册的自定义控件的映射路径,如示例中 CustomAndroidViewPlugin 内的 viewTypeId
AndroidView(
      viewType: 'com.rex.custom.android/customView', //要与注册的路径保持一致
      onPlatformViewCreated: _onPlatformViewCreated,
      creationParams: const <String, dynamic>{'initParams': 'hello world'},
      creationParamsCodec: const StandardMessageCodec(),
    )
将 AndroidView 进行封装,控件名称为 CustomAndroidView ,完整代码如下:
typedef OnViewCreated = Function(CustomViewController);
///自定义AndroidView
class CustomAndroidView extends StatefulWidget {
  final OnViewCreated onViewCreated;
  const CustomAndroidView(this.onViewCreated, {Key? key}) : super(key: key);
  @override
  State<CustomAndroidView> createState() => _CustomAndroidViewState();
}
class _CustomAndroidViewState extends State<CustomAndroidView> {
  late MethodChannel _channel;
  @override
  Widget build(BuildContext context) {
    return _getPlatformFaceView();
  }
  Widget _getPlatformFaceView() {
    return AndroidView(
      viewType: 'com.rex.custom.android/customView',
      onPlatformViewCreated: _onPlatformViewCreated,
      creationParams: const <String, dynamic>{'initParams': 'hello world'},
      creationParamsCodec: const StandardMessageCodec(),
    );
  }
  void _onPlatformViewCreated(int id) {
    _channel = MethodChannel('com.rex.custom.android/customView$id');
    final controller = CustomViewController._(
      _channel,
    );
    widget.onViewCreated(controller);
  }
}
class CustomViewController {
  final MethodChannel _channel;
  final StreamController<String> _controller = StreamController<String>();
  CustomViewController._(
    this._channel,
  ) {
    _channel.setMethodCallHandler(
      (call) async {
        switch (call.method) {
          case 'getMessageFromAndroidView':
            // 从native端获取数据
            final result = call.arguments as String;
            _controller.sink.add(result);
            break;
        }
      },
    );
  }
  Stream<String> get customDataStream => _controller.stream;
  // 发送数据给native
  Future<void> sendMessageToAndroidView(String message) async {
    await _channel.invokeMethod(
      'getMessageFromFlutterView',
      message,
    );
  }
}
代码说明
AndroidView在加载完成时会回调我们的_onPlatformViewCreated方法,小编在 _onPlatformViewCreated 方法内将methodChannel初始化,用于监听 Android 端的方法调用,以及后续用其调用 Android控件内封装的方法。- 小编给 CustomAndroidView 封装了一个 controller 控制类,在 CustomAndroidView 的构造方法中回传给调用者,调用者可通过 controller 进行监听 Android 端传送过来的数据,以及通过 controller 调用控件提供的能力方法。
如何使用这个View
展示 CustomAndroidView :
Widget _buildAndroidView() {
    return CustomAndroidView(_onCustomAndroidViewCreated)
}
接收来自 Android 层的传输数据
void _onCustomAndroidViewCreated(CustomViewController controller) {
    _controller = controller;
    _controller?.customDataStream.listen((data) {
      //接收到来自Android端的数据
      setState(() {
        receivedData = '来自Android的数据:$data';
      });
    });
  }
通过控件发送数据给 Android 层
final randomNum = Random().nextInt(10);
_controller?.sendMessageToAndroidView('flutter - $randomNum ');
// _controller 在CustomAndroidView 的构造方法回调中获取,如标签2
6. 附上 example 完整代码
example/main.dart
void main() {
  runApp(const MaterialApp(home: MyHome()));
}
class MyHome extends StatelessWidget {
  const MyHome({Key? key}) : super(key: key);
  @override
  Widget build(BuildContext context) {
    return const Scaffold(
      body: CustomExample(),
    );
  }
}
class CustomExample extends StatefulWidget {
  const CustomExample({Key? key}) : super(key: key);
  @override
  State<CustomExample> createState() => _CustomExampleState();
}
class _CustomExampleState extends State<CustomExample> {
  String receivedData = '';
  CustomViewController? _controller;
  void _onCustomAndroidViewCreated(CustomViewController controller) {
    _controller = controller;
    _controller?.customDataStream.listen((data) {
      //接收到来自Android端的数据
      setState(() {
        receivedData = '来自Android的数据:$data';
      });
    });
  }
  Widget _buildAndroidView() {
    return Expanded(
      child: Container(
        color: Colors.blueAccent.withAlpha(60),
        child: CustomAndroidView(_onCustomAndroidViewCreated),
      ),
      flex: 1,
    );
  }
  Widget _buildFlutterView() {
    return Expanded(
      child: Stack(
        alignment: AlignmentDirectional.bottomCenter,
        children: [
          Column(
            mainAxisAlignment: MainAxisAlignment.center,
            mainAxisSize: MainAxisSize.max,
            children: [
              TextButton(
                onPressed: () {
                  final randomNum = Random().nextInt(10);
                  _controller
                      ?.sendMessageToAndroidView('flutter - $randomNum ');
                },
                child: const Text('发送数据给Android'),
              ),
              const SizedBox(height: 10),
              Text(receivedData),
            ],
          ),
          const Padding(
            padding: EdgeInsets.only(bottom: 15),
            child: Text(
              'Flutter - View',
              style: TextStyle(
                fontSize: 20,
                fontWeight: FontWeight.bold,
              ),
            ),
          ),
        ],
      ),
      flex: 1,
    );
  }
  @override
  Widget build(BuildContext context) {
    return Column(
      children: [
        _buildAndroidView(),
        _buildFlutterView(),
      ],
    );
  }
}
如上,demo 将一个页面均分为上下两块,上半部分使用 Android 控件,下半部分使用 Flutter 控件,两组控件间进行通信交互。
demo 已上传:github.com/liyufengrex…
以上就是使用PlatformView将 Android 控件view制成Flutter插件的详细内容,更多关于Android view制成Flutter的资料请关注好代码网其它相关文章!